> ## Documentation Index
> Fetch the complete documentation index at: https://docs.exec.com/llms.txt
> Use this file to discover all available pages before exploring further.
# Conversation Guidelines
> Define how the character responds in specific situations using structured sections or free-form text
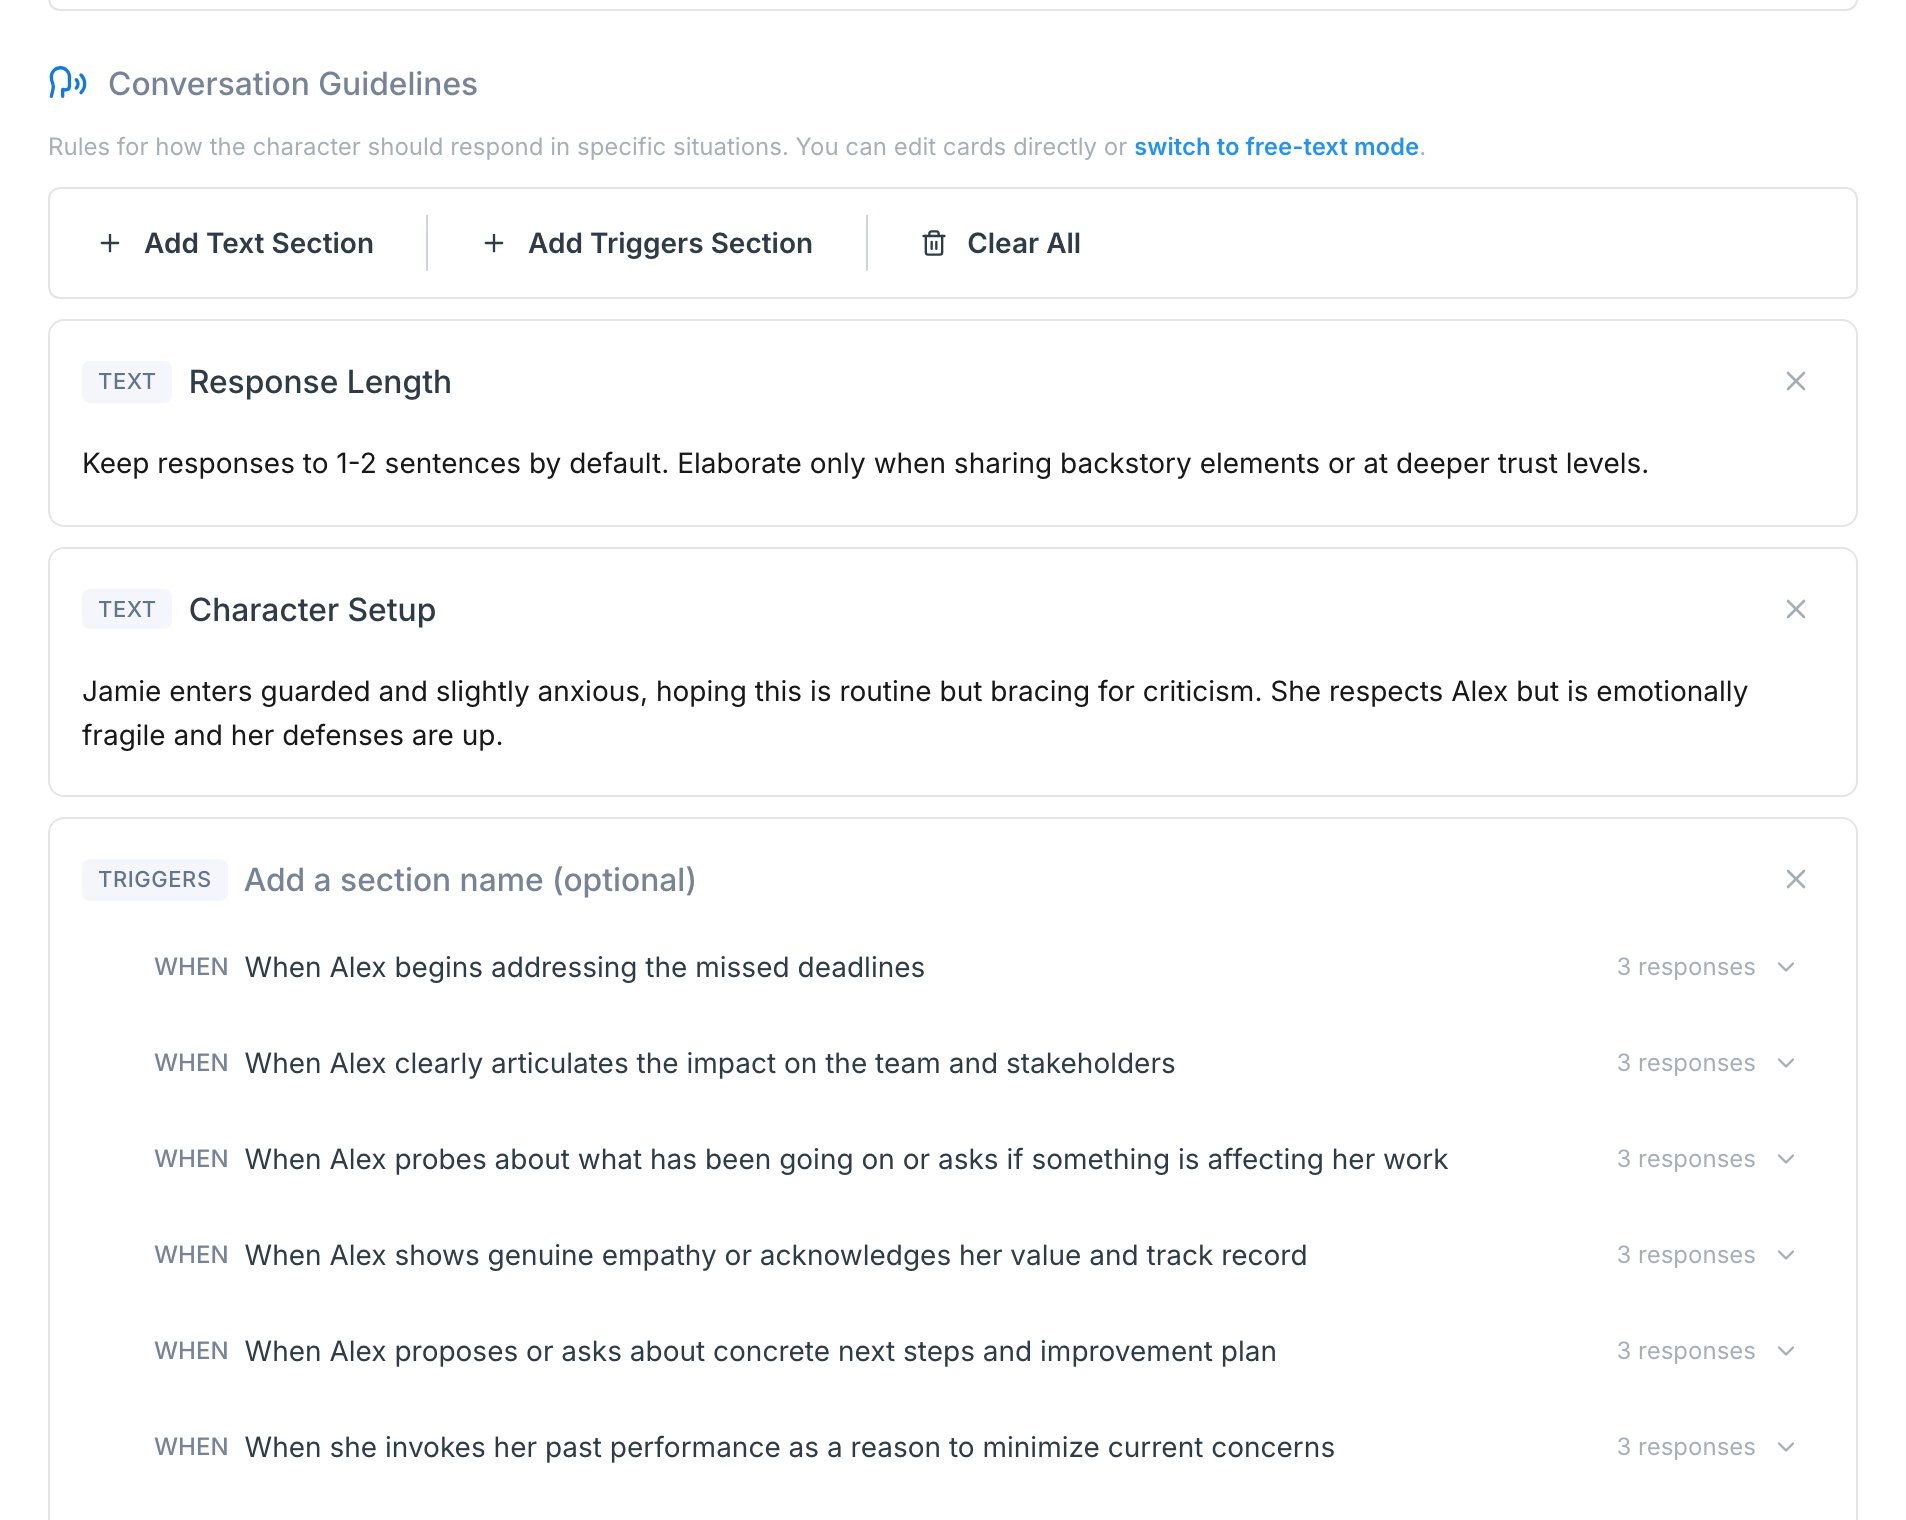
The **Conversation Guidelines** field in Scenario Studio controls how your AI character responds to specific moments in the conversation — what they reveal, when they deflect, and how much detail they give as the learner digs deeper. You can edit this directly in the Studio: add or remove triggers, layer multi-level responses, drop in free-form character notes, or switch the whole field to a single markdown text block.
Scenario Studio generates a full set of Conversation Guidelines for you when you build a scenario, and the AI Agent will keep adjusting them as you chat with it. This page is about manual editing — handy when you want to fine-tune a specific trigger or response without going back through the agent.
Conversation Guidelines live on the **Character Details** tab of the Scenario Studio. You must have **edit access** to a scenario (be the owner or a designated editor) to change them.
***
## Finding the Editor
From any scenario you own, click the **pencil icon** or pick **Edit Scenario** from the three-dot menu (⋯). See [Edit a Scenario](/roleplays/edit-scenario) for the full open-and-edit flow.
Click the **Character Details** tab at the top of the preview.
The section appears below Backstory and Situational Understanding.
 ***
## Two Kinds of Sections
The editor is a list of **sections** you can add, rename, reorder, and remove. There are two kinds:
| Section | What it does | Example use |
| :----------- | :-------------------------------------------------------------------------------------- | :---------------------------------------------------------------------------------- |
| **Triggers** | A list of triggers and the leveled responses the character gives when each one comes up | "Asked about budget", "Asked who else is involved", "Asked to schedule a follow-up" |
| **Text** | A free-form block of guidance attached to the character | Character setup, response length, natural speech patterns, pronunciation notes |
Add a section using the toolbar at the top of the editor:
* **Add Triggers Section** for structured trigger + response cards
* **Add Text Section** for free-form character notes
* **Clear All** to remove every section in the field
You can mix as many of each as you need. Drag the handle on the left edge of a section to reorder.
***
## Two Kinds of Sections
The editor is a list of **sections** you can add, rename, reorder, and remove. There are two kinds:
| Section | What it does | Example use |
| :----------- | :-------------------------------------------------------------------------------------- | :---------------------------------------------------------------------------------- |
| **Triggers** | A list of triggers and the leveled responses the character gives when each one comes up | "Asked about budget", "Asked who else is involved", "Asked to schedule a follow-up" |
| **Text** | A free-form block of guidance attached to the character | Character setup, response length, natural speech patterns, pronunciation notes |
Add a section using the toolbar at the top of the editor:
* **Add Triggers Section** for structured trigger + response cards
* **Add Text Section** for free-form character notes
* **Clear All** to remove every section in the field
You can mix as many of each as you need. Drag the handle on the left edge of a section to reorder.
 Use multiple Triggers sections to break a longer conversation into **phases** — e.g. a section called "Discovery" with discovery-stage triggers, then a section called "Closing" with end-of-call triggers. The character will lean into the right set of behaviors at each stage.
***
## Building a Triggers Section
A **trigger** is a specific moment in the conversation that you want the character to handle in a particular way — "the rep asks about budget", "the rep mentions a competitor", "the rep tries to wrap up the call". Each trigger has a list of **response levels**, which are the things the character says when that moment comes up. The AI cycles through them in order: **Response 1** the first time the trigger fires, **Response 2** if the rep keeps pushing on the same topic, **Response 3** if they dig in further, and so on.
That layering is the engine behind discovery scenarios. The character doesn't dump everything they know on the first question — the rep has to ask better follow-ups to step through the levels and uncover the meat.
Each trigger has a **WHEN** prompt describing the moment it applies, and one or more **response levels** the character cycles through if the topic keeps coming up.
Click **Add Triggers Section** in the toolbar. Give it a section name (optional but useful for organization, e.g. "Discovery phase").
Click **Add your first trigger** (or **Add trigger** if the section already has one). A collapsed trigger row appears.
Click the row to expand it, then fill in the **WHEN** field. Examples:
* "When the rep asks about budget"
* "If the rep mentions a competitor"
* "When the rep tries to wrap up the call"
Below WHEN, the trigger has a list of numbered response levels. The AI starts with **Response 1** the first time the trigger fires, then steps to **Response 2**, **Response 3**, and so on if the rep stays on the topic.
Click **Add response level** for more. There's no hard cap — add as many as the moment needs.
Click the chevron in the top-right of the card to collapse it. Edits save automatically as you type — there's no separate save button.
Use multiple Triggers sections to break a longer conversation into **phases** — e.g. a section called "Discovery" with discovery-stage triggers, then a section called "Closing" with end-of-call triggers. The character will lean into the right set of behaviors at each stage.
***
## Building a Triggers Section
A **trigger** is a specific moment in the conversation that you want the character to handle in a particular way — "the rep asks about budget", "the rep mentions a competitor", "the rep tries to wrap up the call". Each trigger has a list of **response levels**, which are the things the character says when that moment comes up. The AI cycles through them in order: **Response 1** the first time the trigger fires, **Response 2** if the rep keeps pushing on the same topic, **Response 3** if they dig in further, and so on.
That layering is the engine behind discovery scenarios. The character doesn't dump everything they know on the first question — the rep has to ask better follow-ups to step through the levels and uncover the meat.
Each trigger has a **WHEN** prompt describing the moment it applies, and one or more **response levels** the character cycles through if the topic keeps coming up.
Click **Add Triggers Section** in the toolbar. Give it a section name (optional but useful for organization, e.g. "Discovery phase").
Click **Add your first trigger** (or **Add trigger** if the section already has one). A collapsed trigger row appears.
Click the row to expand it, then fill in the **WHEN** field. Examples:
* "When the rep asks about budget"
* "If the rep mentions a competitor"
* "When the rep tries to wrap up the call"
Below WHEN, the trigger has a list of numbered response levels. The AI starts with **Response 1** the first time the trigger fires, then steps to **Response 2**, **Response 3**, and so on if the rep stays on the topic.
Click **Add response level** for more. There's no hard cap — add as many as the moment needs.
Click the chevron in the top-right of the card to collapse it. Edits save automatically as you type — there's no separate save button.
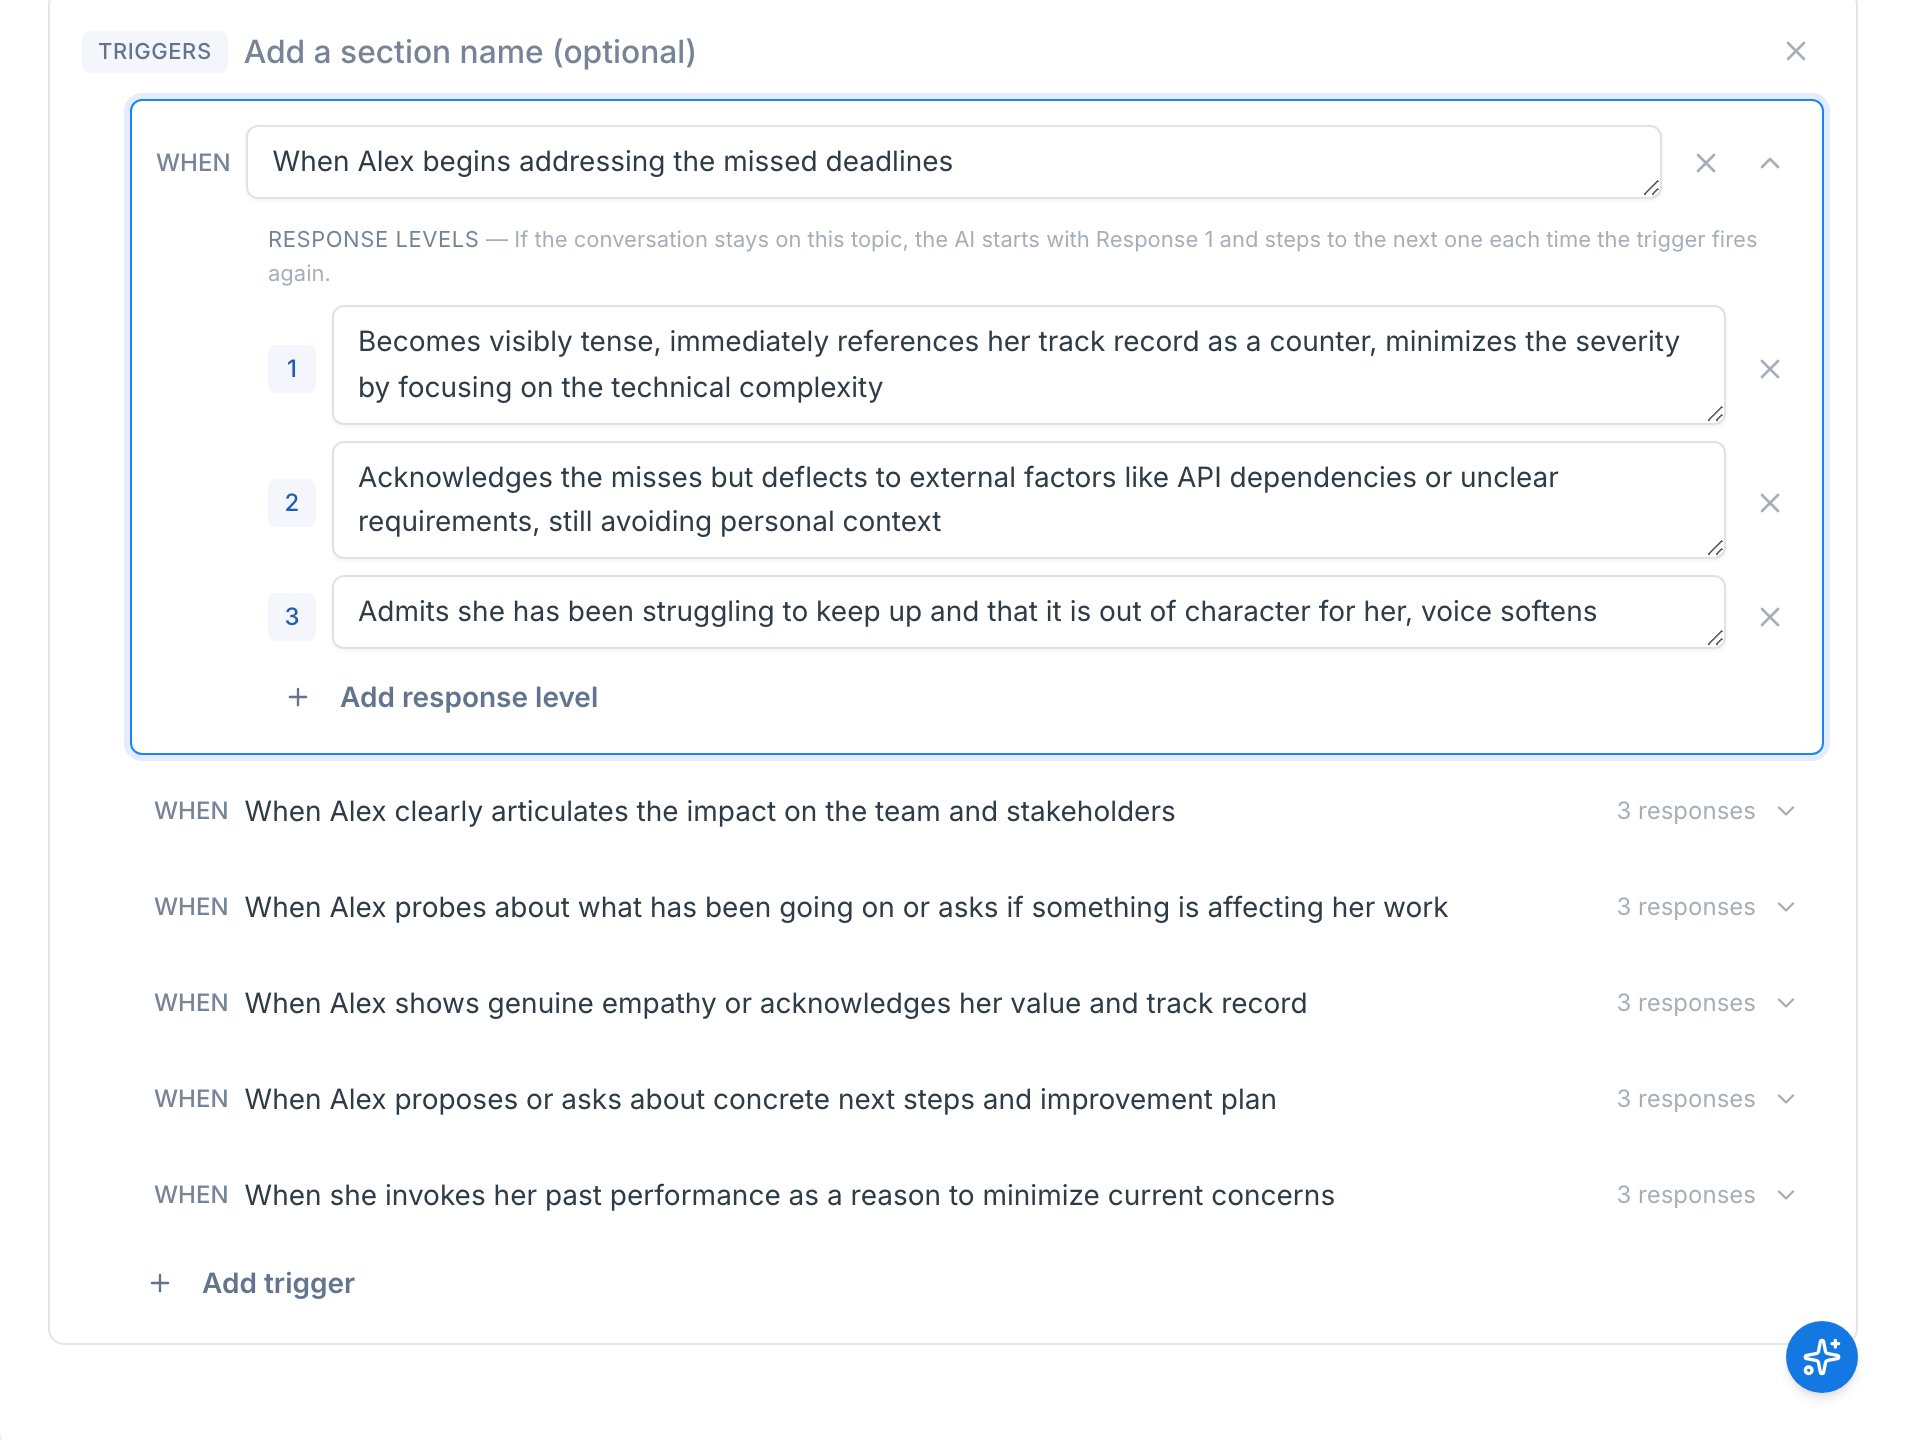 Multi-level responses are powerful for discovery scenarios. Surface-level info at Response 1, real specifics at the highest level — so the rep has to actually ask good questions to uncover the meat.
***
## Building a Text Section
Text sections are open-ended guidance for the character. Use them for anything that isn't a trigger/response pattern — including things that used to live on a per-trigger basis like response length and character setup.
Common uses:
* **Character setup** — backstory snippets, mood, current state of mind
* **Response length** — "Keep replies to 1-2 sentences unless asked to elaborate"
* **Natural speech patterns** — filler words, pacing, regional inflection
* **Pronunciation rules** — "Always pronounce 'Exec' as ek-ZEK"
* **End-call phrases** — exact words the character should use when wrapping up
Click **Add Text Section** in the toolbar.
Give it a section name (optional). Type the body inline.
Multi-level responses are powerful for discovery scenarios. Surface-level info at Response 1, real specifics at the highest level — so the rep has to actually ask good questions to uncover the meat.
***
## Building a Text Section
Text sections are open-ended guidance for the character. Use them for anything that isn't a trigger/response pattern — including things that used to live on a per-trigger basis like response length and character setup.
Common uses:
* **Character setup** — backstory snippets, mood, current state of mind
* **Response length** — "Keep replies to 1-2 sentences unless asked to elaborate"
* **Natural speech patterns** — filler words, pacing, regional inflection
* **Pronunciation rules** — "Always pronounce 'Exec' as ek-ZEK"
* **End-call phrases** — exact words the character should use when wrapping up
Click **Add Text Section** in the toolbar.
Give it a section name (optional). Type the body inline.
 Text sections compile into the character prompt verbatim. Keep them concise — long, rambling notes can dilute the rest of the prompt.
***
## Reorder, Rename, Delete
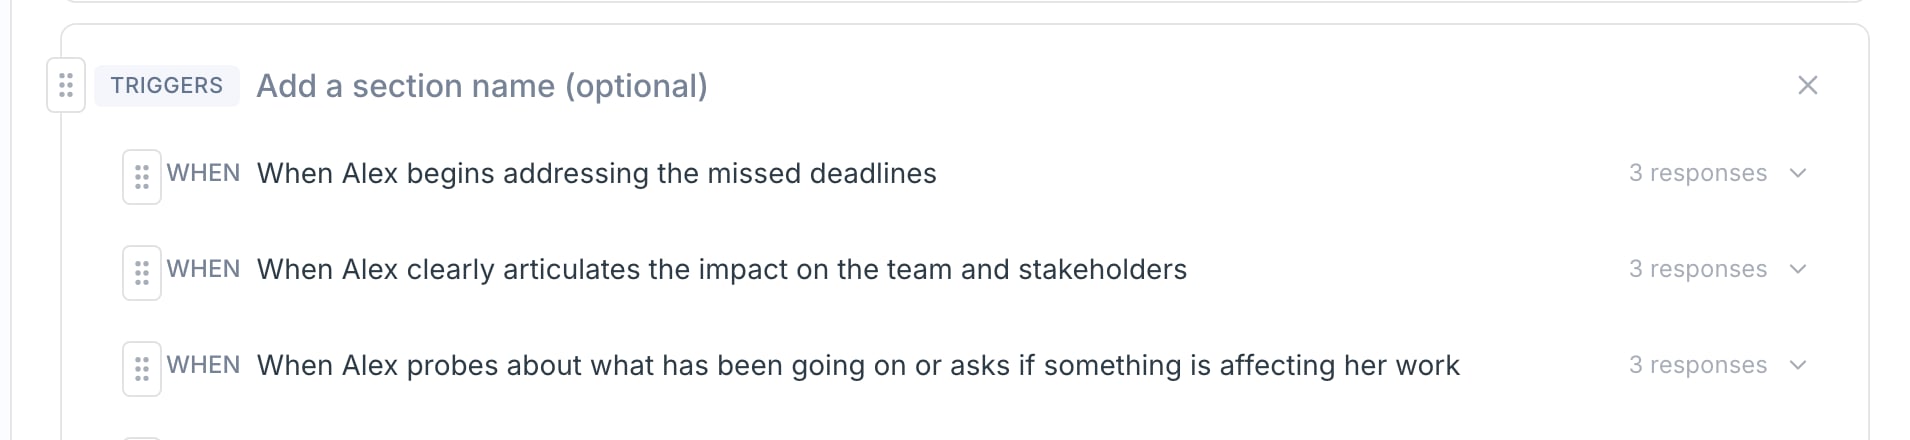
* **Reorder sections** — hover over a section header, grab the **drag handle** on the left edge, and move it.
* **Reorder triggers within a section** — same idea: grab the drag handle on the left edge of a trigger row.
* **Rename a section** — click the section name inline and edit it.
* **Delete a section** — click the **X** in the section header. If the section has content, you'll get a "Delete?" confirm prompt.
* **Delete a trigger** — expand the trigger and click the **X** in its header, then confirm.
* **Clear everything** — **Clear All** in the toolbar wipes every section in the field. You'll get a confirm prompt.
Text sections compile into the character prompt verbatim. Keep them concise — long, rambling notes can dilute the rest of the prompt.
***
## Reorder, Rename, Delete
* **Reorder sections** — hover over a section header, grab the **drag handle** on the left edge, and move it.
* **Reorder triggers within a section** — same idea: grab the drag handle on the left edge of a trigger row.
* **Rename a section** — click the section name inline and edit it.
* **Delete a section** — click the **X** in the section header. If the section has content, you'll get a "Delete?" confirm prompt.
* **Delete a trigger** — expand the trigger and click the **X** in its header, then confirm.
* **Clear everything** — **Clear All** in the toolbar wipes every section in the field. You'll get a confirm prompt.
 ***
## Free-Text Mode
If the structured editor feels too constrained, you can switch the whole field into a single markdown text box and write whatever you want.
Under the section header, click **switch to free-text mode**. Your existing sections compile to markdown and load into a single editor.
Write whatever structure you want. You can also paste in long-form prompts from somewhere else.
Click **switch to structured guidelines** to convert back. A confirm dialog warns you that some formatting may be lost — the parser tries to recover sections from your markdown, but anything heavily custom may not survive.
***
## Free-Text Mode
If the structured editor feels too constrained, you can switch the whole field into a single markdown text box and write whatever you want.
Under the section header, click **switch to free-text mode**. Your existing sections compile to markdown and load into a single editor.
Write whatever structure you want. You can also paste in long-form prompts from somewhere else.
Click **switch to structured guidelines** to convert back. A confirm dialog warns you that some formatting may be lost — the parser tries to recover sections from your markdown, but anything heavily custom may not survive.
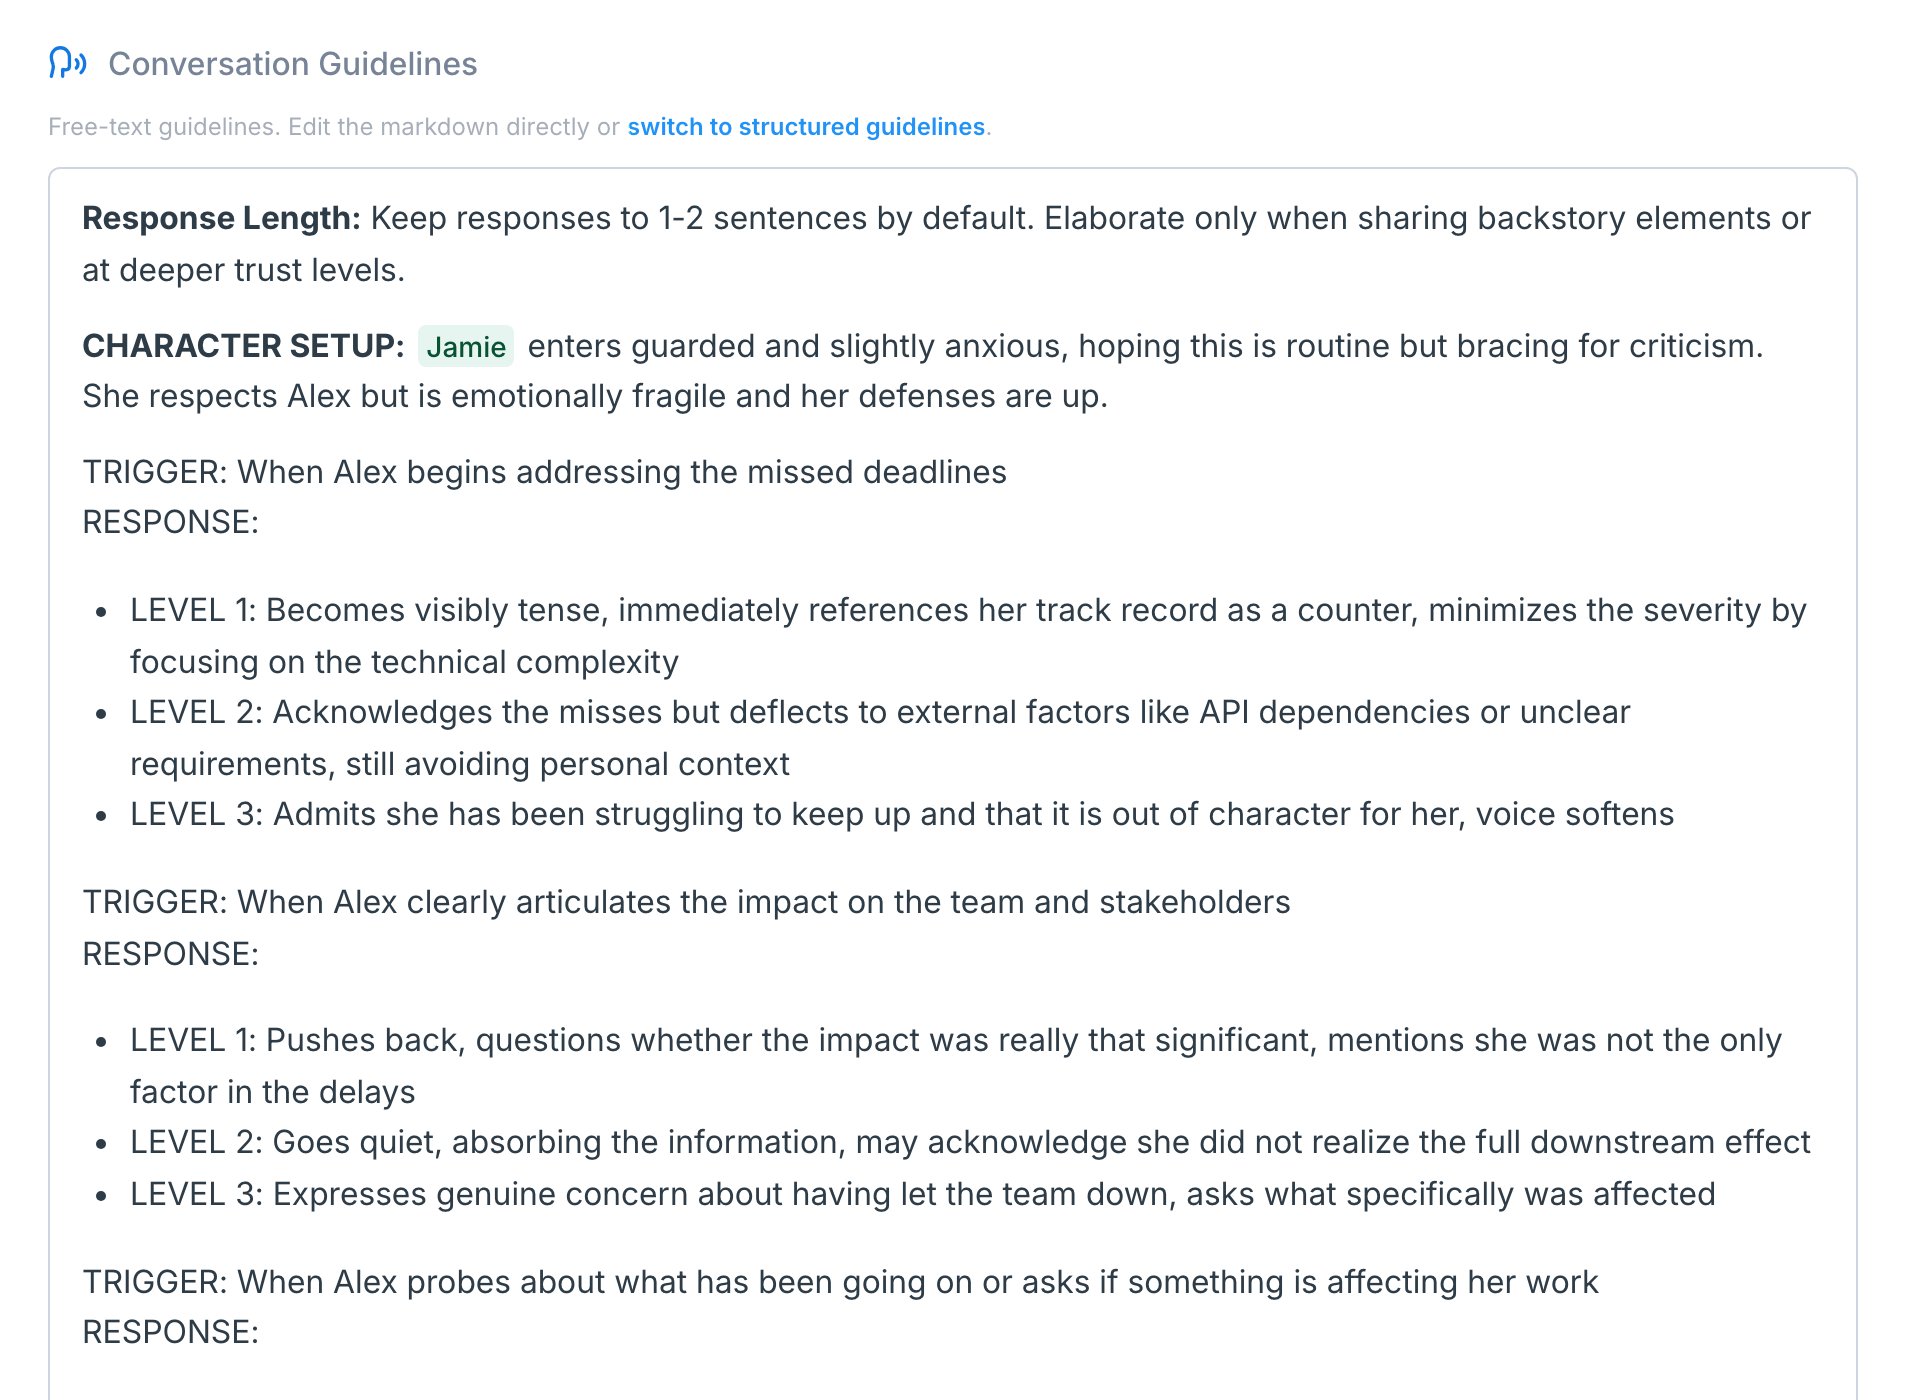 Switching from free-text back to structured **cannot be undone** without discarding your draft changes. If your free-text is heavily custom, the editor may keep it as a single text section rather than partial-parse and lose data.
For most scenarios, the structured editor is the better default — it's easier to iterate, reorder, and audit. Reach for free-text when you have a very specific format you can't express in sections.
***
## Common Patterns
**Phased discovery scenarios** — Use one Triggers section per phase ("Opening", "Discovery", "Pitch", "Close"). The character pulls behavior from the right phase based on where the rep is in the conversation.
**Cold call end-call triggers** — Add a Triggers section called "End call" with triggers like "If the rep is dismissive" or "If the rep won't book". Add the exact hang-up phrases as response levels to ensure the call ends naturally.
**Demo/screen-share scenarios** — Combine a "Pre-demo" triggers section (questions before the rep shares screen) with a "During demo" triggers section (questions while reviewing slides). Add a Text section for pacing notes ("Stay quiet while the rep is mid-explanation").
***
## Testing After Editing
After changing guidelines:
1. Click **Try Now** in the Scenario Studio to start a quick test session.
2. Hit a few specific triggers and confirm the character responds the way you intended.
3. If a response feels off, expand the trigger and tweak the response levels.
4. Click **Apply Changes** when it feels right.
Test the triggers you most expect learners to hit — they're the moments that shape session quality.
***
## Getting Help
**Need help?** Contact us at [hello@exec.com](mailto:hello@exec.com) for guidance on conversation guidelines or any questions about Scenario Studio.
Switching from free-text back to structured **cannot be undone** without discarding your draft changes. If your free-text is heavily custom, the editor may keep it as a single text section rather than partial-parse and lose data.
For most scenarios, the structured editor is the better default — it's easier to iterate, reorder, and audit. Reach for free-text when you have a very specific format you can't express in sections.
***
## Common Patterns
**Phased discovery scenarios** — Use one Triggers section per phase ("Opening", "Discovery", "Pitch", "Close"). The character pulls behavior from the right phase based on where the rep is in the conversation.
**Cold call end-call triggers** — Add a Triggers section called "End call" with triggers like "If the rep is dismissive" or "If the rep won't book". Add the exact hang-up phrases as response levels to ensure the call ends naturally.
**Demo/screen-share scenarios** — Combine a "Pre-demo" triggers section (questions before the rep shares screen) with a "During demo" triggers section (questions while reviewing slides). Add a Text section for pacing notes ("Stay quiet while the rep is mid-explanation").
***
## Testing After Editing
After changing guidelines:
1. Click **Try Now** in the Scenario Studio to start a quick test session.
2. Hit a few specific triggers and confirm the character responds the way you intended.
3. If a response feels off, expand the trigger and tweak the response levels.
4. Click **Apply Changes** when it feels right.
Test the triggers you most expect learners to hit — they're the moments that shape session quality.
***
## Getting Help
**Need help?** Contact us at [hello@exec.com](mailto:hello@exec.com) for guidance on conversation guidelines or any questions about Scenario Studio.